Klipper, Mainsail, Moonraker
This section will show you how to set up Mainsail (Web UI), Moonraker (API), and Klipper (firmware).
info
If your 3D printer ships with Marlin firmware, achieving reliably great results with Klipper will require tinkering/tuning.
Prerequisites
Make sure you've have the following before proceeding to the next section:
Configure Klipper printer.cfg
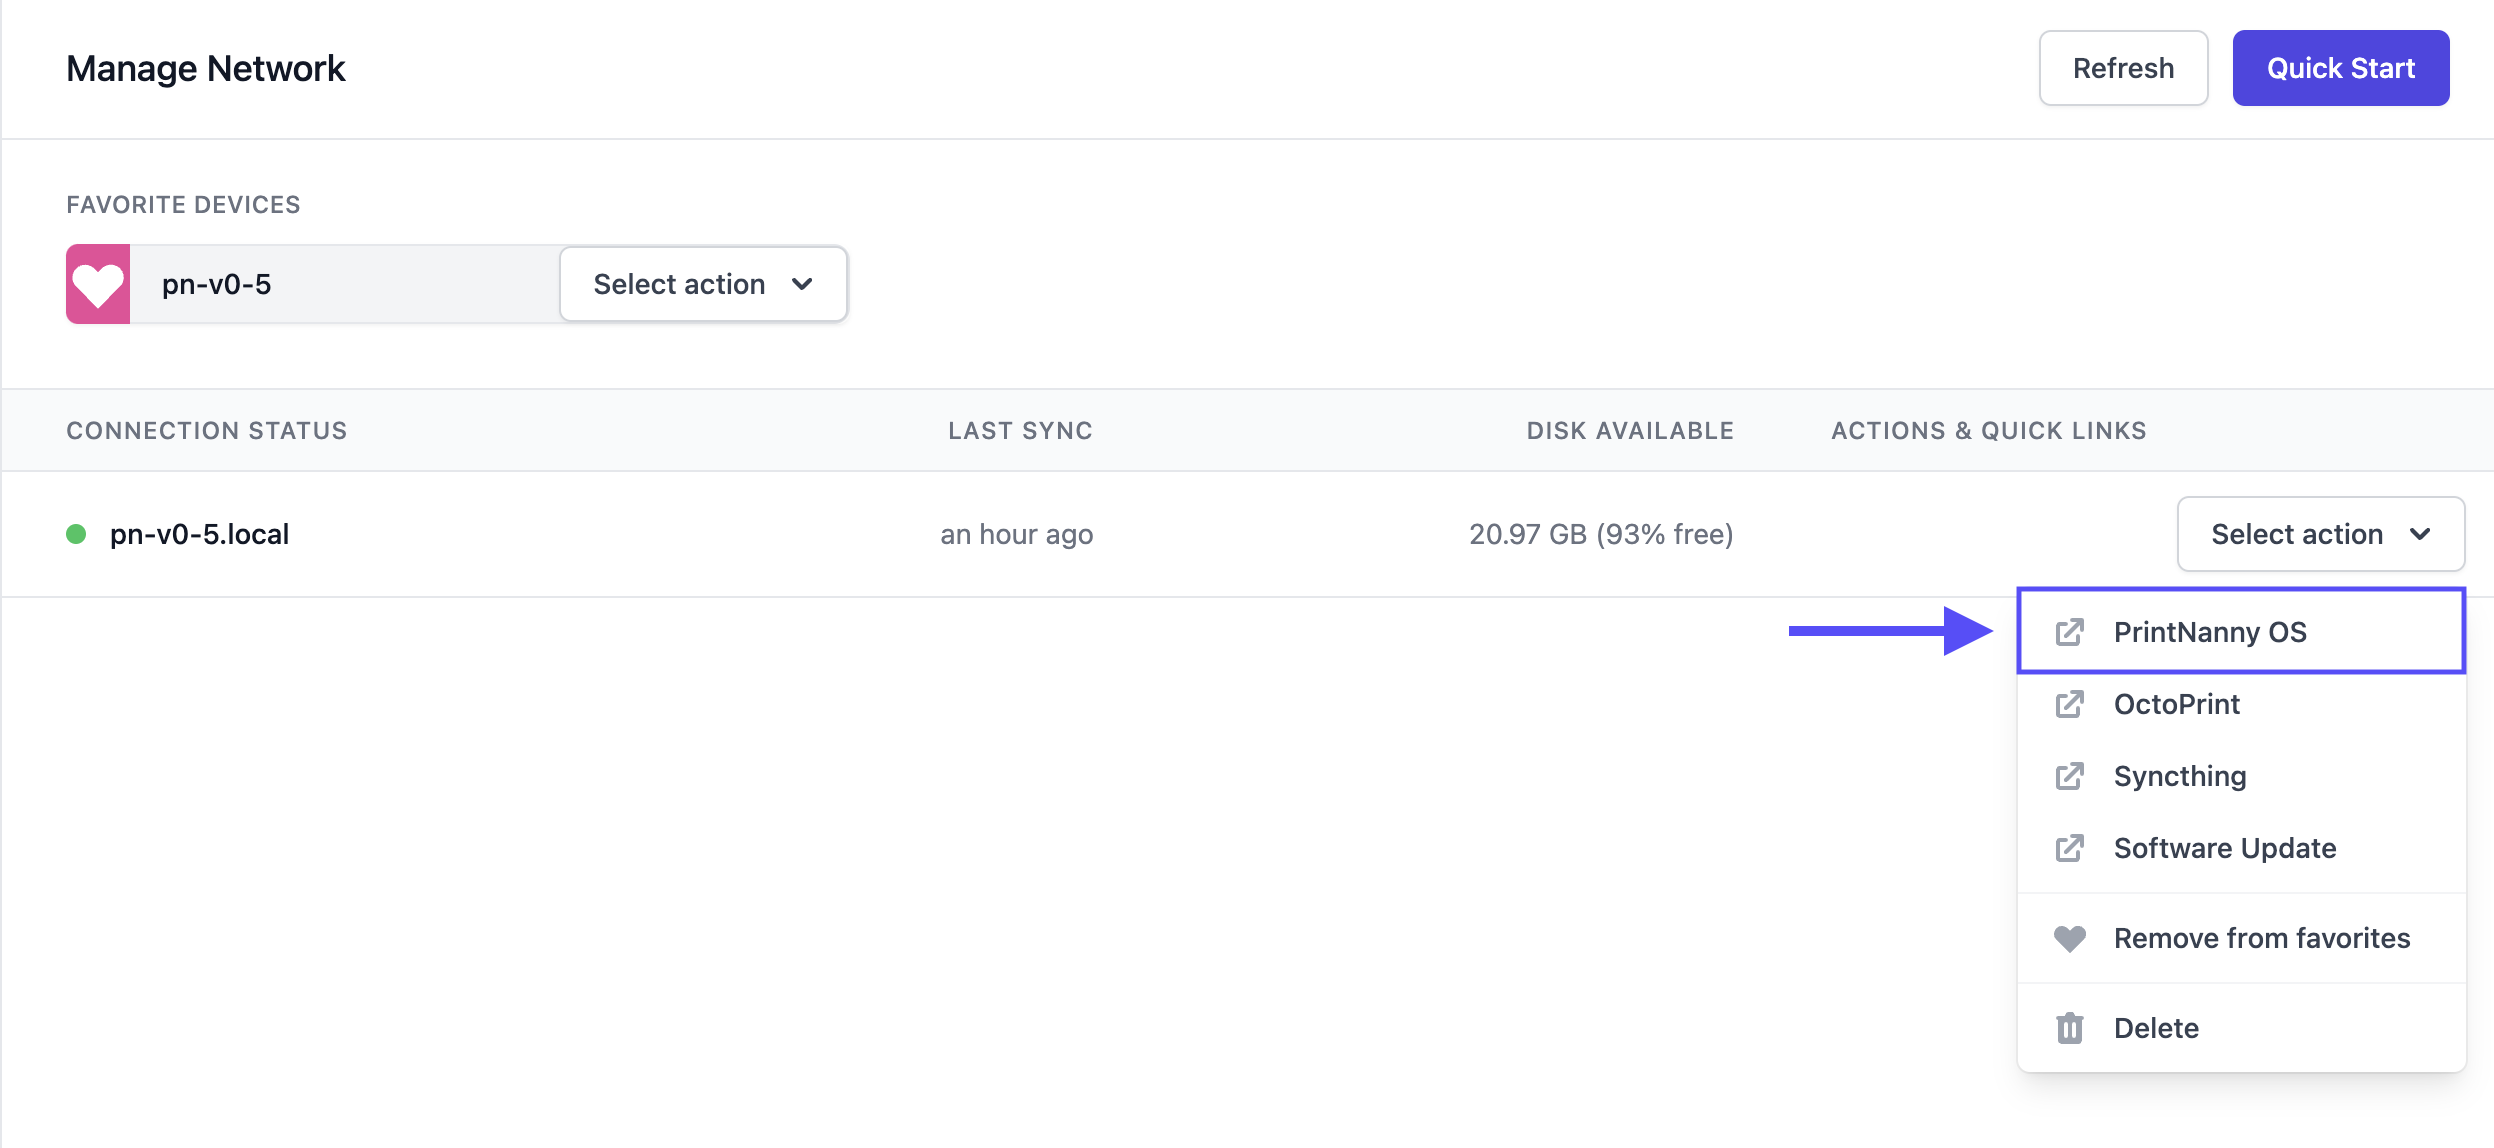
1. Log into PrintNanny Cloud
- Open https://printnanny.ai/devices/ in your browser and log into PrintNanny Cloud.
2. Open Mission Control
- Click the PrintNanny OS link in the Actions & Quick Links menu. This will open PrintNanny OS's Mission Control dashboard.
3. Open PrintNanny OS settings.
- Click the gear icon ⚙️ to open PrintNanny OS settings.
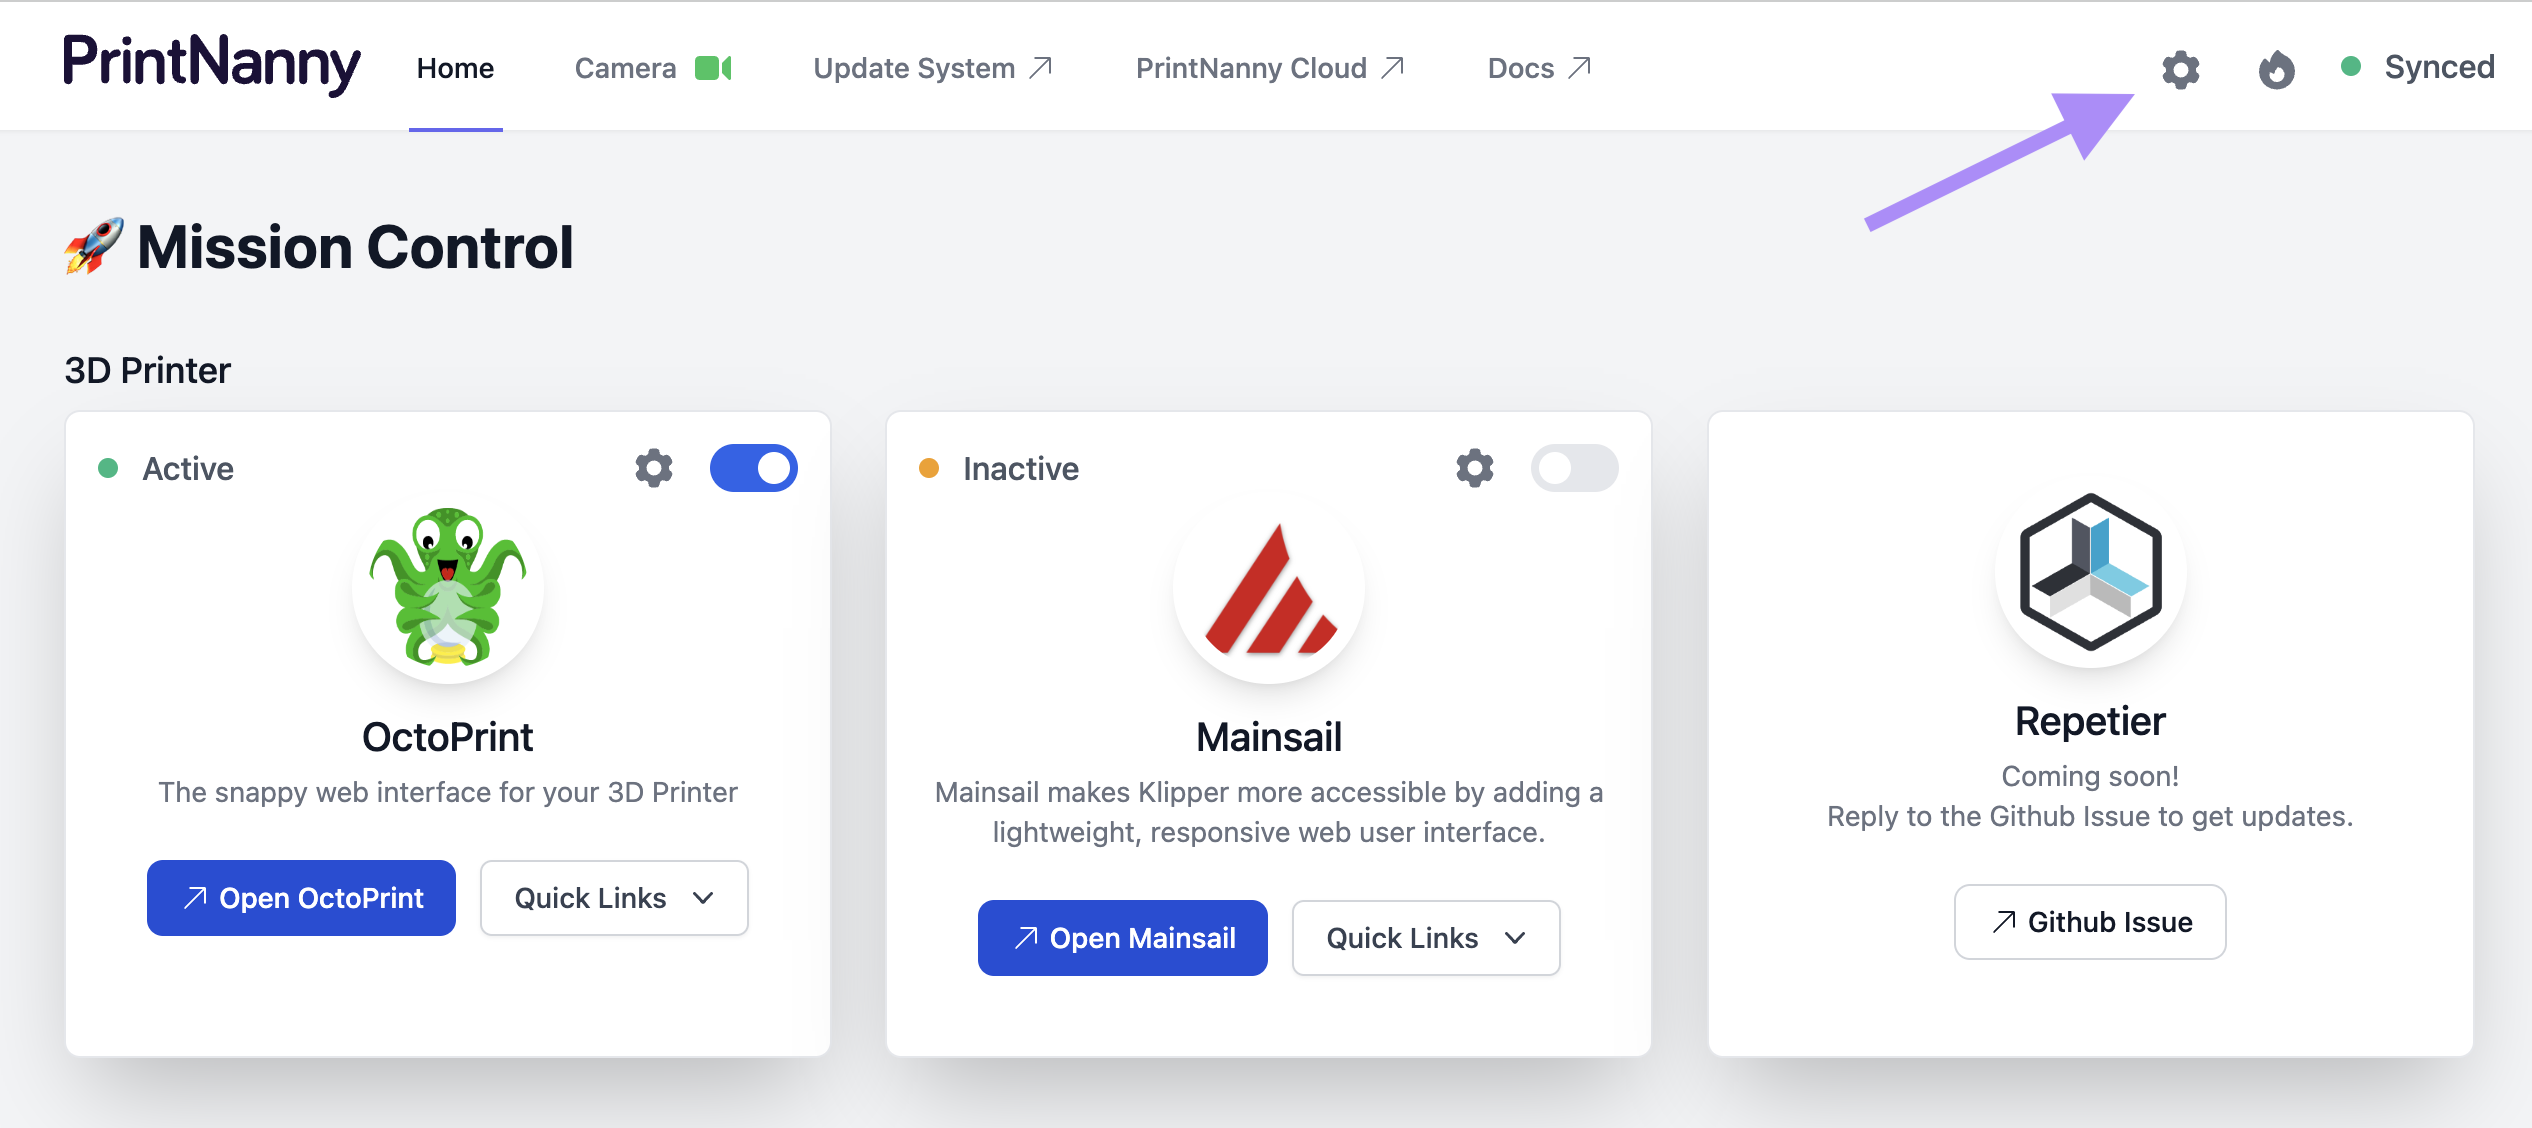
- Click
Edit Settings Filesin the left-hand menu, and selectklipper/printer.cfgfrom the file drop-down.

4. Edit Klipper Configuration
- Copy/paste the following into the code editor:
###
# This file contains Klipper configuration.
# See https://www.klipper3d.org/Example_Configs.html for reference.
###

###
# Mainsail macros - DO NOT DELETE below this line!
###

[pause_resume]

[display_status]

[virtual_sdcard]
path: ~/media/gcode
on_error_gcode:
  CANCEL_PRINT

[gcode_macro CANCEL_PRINT]
description: Cancel the actual running print
rename_existing: CANCEL_PRINT_BASE
variable_park: True
gcode:
  ## Move head and retract only if not already in the pause state and park set to true
  {% if printer.pause_resume.is_paused|lower == 'false' and park|lower == 'true'%}
    _TOOLHEAD_PARK_PAUSE_CANCEL
  {% endif %}
  TURN_OFF_HEATERS
  M106 S0
  CANCEL_PRINT_BASE

[gcode_macro PAUSE]
description: Pause the actual running print
rename_existing: PAUSE_BASE
gcode:
  PAUSE_BASE
  _TOOLHEAD_PARK_PAUSE_CANCEL

[gcode_macro RESUME]
description: Resume the actual running print
rename_existing: RESUME_BASE
gcode:
  ##### read extrude from  _TOOLHEAD_PARK_PAUSE_CANCEL  macro #####
  {% set extrude = printer['gcode_macro _TOOLHEAD_PARK_PAUSE_CANCEL'].extrude %}
  #### get VELOCITY parameter if specified ####
  {% if 'VELOCITY' in params|upper %}
    {% set get_params = ('VELOCITY=' + params.VELOCITY)  %}
  {%else %}
    {% set get_params = "" %}
  {% endif %}
  ##### end of definitions #####
  {% if printer.extruder.can_extrude|lower == 'true' %}
    M83
    G1 E{extrude} F2100
    {% if printer.gcode_move.absolute_extrude |lower == 'true' %} M82 {% endif %}
  {% else %}
    {action_respond_info("Extruder not hot enough")}
  {% endif %}
  RESUME_BASE {get_params}

[gcode_macro _TOOLHEAD_PARK_PAUSE_CANCEL]
description: Helper: park toolhead used in PAUSE and CANCEL_PRINT
variable_extrude: 1.0
gcode:
  ##### set park positon for x and y #####
  # default is your max posion from your printer.cfg
  {% set x_park = printer.toolhead.axis_maximum.x|float - 5.0 %}
  {% set y_park = printer.toolhead.axis_maximum.y|float - 5.0 %}
  {% set z_park_delta = 2.0 %}
  ##### calculate save lift position #####
  {% set max_z = printer.toolhead.axis_maximum.z|float %}
  {% set act_z = printer.toolhead.position.z|float %}
  {% if act_z < (max_z - z_park_delta) %}
    {% set z_safe = z_park_delta %}
  {% else %}
    {% set z_safe = max_z - act_z %}
  {% endif %}
  ##### end of definitions #####
  {% if printer.extruder.can_extrude|lower == 'true' %}
    M83
    G1 E-{extrude} F2100
    {% if printer.gcode_move.absolute_extrude |lower == 'true' %} M82 {% endif %}
  {% else %}
    {action_respond_info("Extruder not hot enough")}
  {% endif %}
  {% if "xyz" in printer.toolhead.homed_axes %}
    G91
    G1 Z{z_safe} F900
    G90
    G1 X{x_park} Y{y_park} F6000
    {% if printer.gcode_move.absolute_coordinates|lower == 'false' %} G91 {% endif %}
  {% else %}
    {action_respond_info("Printer not homed")}
  {% endif %}
###
# Mainsail macros - DO NOT DELETE above this line!
###

###
# Paste your printer configuration below this section
###
- In a new tab, open Klipper's example configuration files and copy/paste the
.cfgfor your 3D printer.
info
If you're not sure which Klipper configuration to use, refer to Klipper's configuration docs for more information.
- Click the Save button to save your changes.
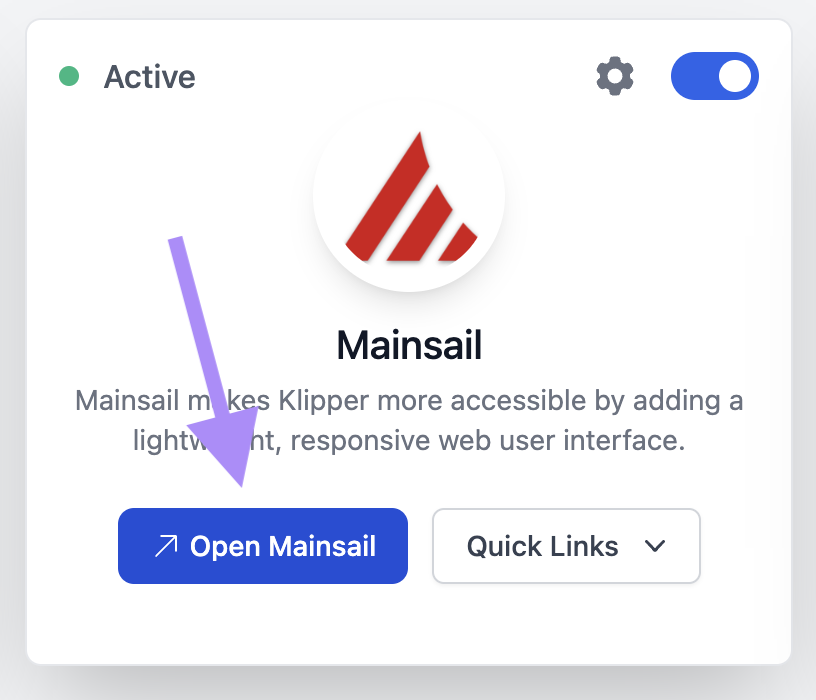
Enable Mainsail
- Click
Hometo return to Mission Control - Use the toggle-switch to enable the Mainsail add-on.
info
The first time you enable Mainsail, you'll need to wait a few extra minutes.
When you see the notification Mainsail is now available you can proceed to the next step.
Click the
Open Mainsailbutton to open the Mainsail dashboard in a new tab.Refer to Mainsail settings to continue customizing your Mainsail dashboard.